Hair Transplant Plug Repair – Case Study
Today, thanks to advancements in hair transplant technology and techniques, we are now able to restore patients’ hairlines with amazing results that are relatively undetectable to the layman’s eye. However, many people are unaware of the advancements made in the hair transplant field and believe that hair transplants still yield the same “pluggy” results seen from procedures performed 20+ years ago.
Thankfully, since the art and science of hair transplantation have greatly improved over the past couple of decades, giving patients who have suffered from “pluggy” hair transplants the option to fix the results from previously botched procedures has never been easier.
Case Study:
The following case study features a patient who had 3 transplants over 20 years ago. Watch Dr. Mohebi as he restores the hairline while eliminating the plugs and scars left behind from the previous procedures in the video below.
In the following, we will review the hair transplant from a patient who previously had “pluggy” hair transplants (see video above). The gentleman had three hair transplants done before with three scars in the back and plug hair in front.
This patient’s case is typical of the procedures that were done over twenty years ago with plugs, mini grafts, and micro grafts. Today we are going to restore the patient’s hair with modern follicular transplants.
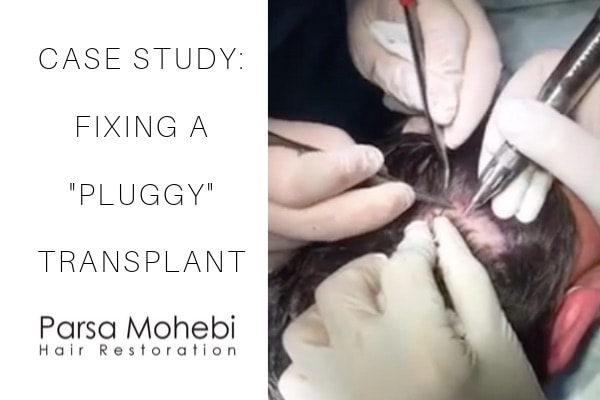
Reviewing The Previous “Pluggy” Procedure
As you can see in the video, when we look down here we see doll hair-like pattern. These are the “pluggy” areas. The front of the patient’s scalp has some empty areas, the gutters are empty and then we have multiple scars in the back, which is something we do not like to see. It is typically better to have just one scar, but we will remove those scars with this strip as much as we can.

We also see the patient still has his own hair. We’re going to re-do his hairline, including the front, corners, and the gutters here on both sides and a little of the crown area. We draw the lines before we do the shaving, so we know which area we have to put maximum density on.
Fixing The “Pluggy” Transplants
Once the patient’s medication and local anesthesia kick in, we begin with the procedure!
We begin by making sites, starting with single hairlines and going back. If you see the geometric pattern pointed out by Dr. Mohebi in the video, we see that these are the “plugged” areas. The patient probably had more hair there and ended up losing everything, so we need to fill those.
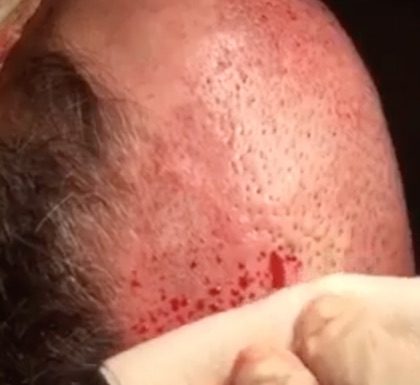
After the hairline is formed, we cover those plug areas in the corners and the sides. We also restored the patient’s gutters, which were open from the transplant and plug hairs in past on two sides. If he had more grafts, we would probably go and fill some of those gaps, but that is not necessary to give him a good result. As long as we have good coverage in front and gutters, those always will be covered so we don’t have to worry about them.
Next, we removed pieces of the strip and then we harvest the grafts so the graft will not sit out for a long time, and place the grafts in the sites. And that’s it!
As you can now see, the whole frontal area is now transplanted. The patient has a new hairline that we just re-created and beautiful. The area that was already transplanted by multiple hair transplants past it looked “pluggy” but once it begins to grow back, the grafts will look perfectly natural at the end and those plugs won’t be visible anymore.
Did you have a previous hair transplant that looks “pluggy”? Contact us today to learn about your options for fixing your previous procedure today!